How This Reno Streamlined Its Baths With Floor to Ceiling Tile

Suburban life wasn’t for them. That’s the conclusion one couple came to when they decided to leave the ‘burbs for a 1,100-square-foot prewar co-op on Manhattan’s Upper West Side.

Their new home, though, was far from turnkey. With a previous renovation behind them and a clear eye for the apartment’s potential, the homeowners posted their project on Sweeten, a free service that matches renovators with vetted general contractors, and eventually hired a design-build firm to bring their vision to life.

The result was a Paris-inspired apartment that balances clean, modern elements with a hint of traditional style, plus floor-to-ceiling tile in both bathrooms that helped each space feel larger.

An Upper West Side co-op's living room with chandelier and French doors
  • Homeowners: A couple trading suburban life for city living posted their apartment renovation on Sweeten
  • Where: Upper West Side, Manhattan, New York City
  • Primary renovation: The layout was reworked to improve the bedrooms and living spaces, including creating an office, while the kitchen was rebuilt with more storage and a cleaner look. A former storage room was turned into a second bathroom, and both bathrooms were finished with floor-to-ceiling tile.
  • Homeowner’s quote: “Our Sweeten contractor had a very high level of service and gave us great advice throughout the process. One of the best suggestions they made was to build a large closet space (bigger than we thought we needed) in the hallway, and he was right.”

Guest blog post by Sweeten homeowner

Leaving suburbia for a prewar co-op renovation

Outside of a prewar co-op apartment in Upper West Side, Manhattan

Good things take time, and while the decor in our apartment is still a work in progress, the renovation itself wrapped up on schedule and without issues. That felt like a major accomplishment given how many updates we had planned.

We had already tried suburban life and realized it wasn’t for us, so we set our sights on the Upper West Side and rented in the neighborhood while we searched. When we found this prewar co-op, built in 1929 with original beams, we knew it would need a full renovation.

We saw a lot of potential in the space, but we also knew it needed to work better for our needs. The apartment felt dated and neglected.

Luckily, we already had some renovation experience from a smaller project at our home in the suburbs, but renovating in the city is a whole different experience.

Planning to renovate? Get free cost estimates from our partner GCs!

Get matched with our vetted general contractors and receive at least 3 quotations for free! You can also find endless home renovation inspiration, detailed guides, and practical cost breakdowns from our blogs.

Choosing the right team for a Paris-inspired redo

A renovated dining area in the Upper West Side featuring a wooden dining table, hardwood flooring, chandelier, and transparent chairs

When we posted our project on Sweeten, we were matched with a design-build firm, and after our initial interview, we felt they were a strong fit. What gave us even more confidence was the feedback Sweeten shared about the firm, which helped confirm our decision.

The design-build team was especially good at thinking through layout options and making the most of a small apartment. One of the biggest changes was dividing the original large living room into two spaces: an office that could eventually become a third bedroom, and a new living area created by converting one of the former bedrooms. French doors now connect the living room and office, which gives the layout more flexibility without making it feel closed off.

Our vision for the apartment was inspired by Paris interiors. We knew this co-op did not have quite the same layout, but we still wanted to mix clean, modern elements, especially in the kitchen, with traditional details like crystal chandeliers.

A galley kitchen redone for storage and a cleaner look

A galley kitchen featuring white cabinetry, white countertops, and marble backsplash
Slide
previous arrow
next arrow
 

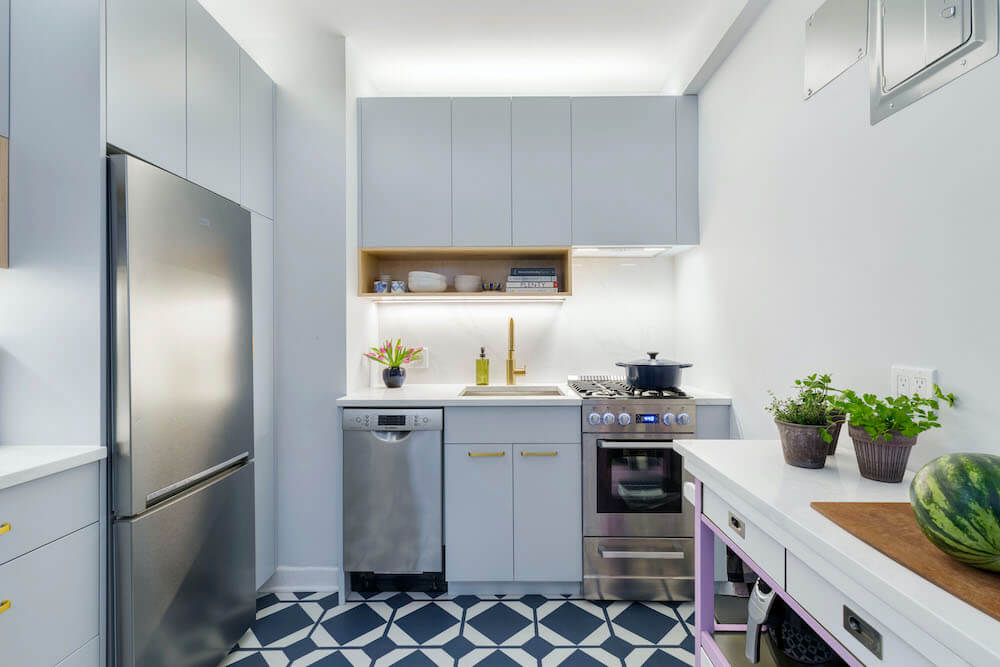
For starters, the kitchen was in rough shape. It looked like it had last been renovated in the 1970s, with worn finishes, a poorly used layout, and blue tile floors that did the space no favors.

From the start, we knew we wanted very dark floors and a clean, white minimalist kitchen with matching countertops and backsplash. We also felt that extending the wood floors into the kitchen would help it feel more connected to the rest of the apartment and make the space look a little larger.

A renovated galley kitchen featuring white countertops, marble backsplash, white cabinetry, and dark hardwood flooring

The kitchen is a standard New York City galley, so making the most of every inch was a priority. We planned for cabinets that reached the ceiling and worked hard to fit in a large refrigerator, a dishwasher, a washer/dryer unit, and a water filtration system without giving up storage.

A galley kitchen's marble countertop and backsplash with farmhouse faucet and white cabinets

We wanted the kitchen and bathrooms to have a clean, modern white look that would contrast with the more traditional feel of the rest of the apartment. In the kitchen, that meant keeping hardware to a minimum with push-open cabinets, a paneled fridge and dishwasher, and a hidden washer and dryer tucked inside one of the cabinets.

We were especially happy with how much storage we ended up with. Thoughtful details like a spice rack also helped keep pantry items organized.

Renovate expertly with Sweeten

Sweeten brings homeowners an exceptional renovation experience by personally matching trusted general contractors to your project, while offering expert guidance and support—at no cost to you.

Start your renovation

All of that was a lot to ask, but there was more.

Adding floor-to-ceiling tile in both bathrooms

A remodeled master bathroom with floor-to-ceiling tile, glass shower doors, and floating vanity

The bathroom also needed a lot of work. It had a walk-in shower designed for universal access that we did not need, and it took up far too much space. The sink was oversized but offered no storage, and overall, the room did not have the clean, modern look we wanted.

A shower area showcasing chrome fixtures, a mirrored medicine cabinet to the side and glass shower doors

We used large marble-look bathroom tiles from floor to ceiling to make the space feel larger. A glass shower enclosure kept the room looking clean and light without the visual weight of a shower curtain.

We also added a floating cabinet under the sink for extra storage and a built-in mirror with added lighting. In the end, the bathroom came together beautifully.

A guest bathroom with floor to ceiling tile, window, towel holder, and vanity

The second bathroom, a smaller space that had previously been used for storage, came with its own challenges. We made the most of it by fitting in a proper toilet and a compact sink with a similar floating cabinet. Using the same tile approach in a stone finish also helped the room feel more spacious.

How the right storage made a difference

A renovated closet with a bathroom next to it

Our Sweeten contractor gave us thoughtful advice throughout the process. One of the best suggestions was building a larger hallway closet than we had originally planned, and it turned out to be exactly what we needed.

At first, we thought a narrow closet for coats would be enough, but we now use every inch of that space for coats, shoes, storage baskets, suitcases, and other gear. Our contractor also suggested adding a smaller closet in another room, something we had not considered at the start.

Without our contractor’s guidance, we would have missed storage we now use every day. Their experience and ability to understand our vision helped create a home that fits the way we live.

From approvals to a finished home

A remodeled galley kitchen with white marble backsplash and countertops with white cabinetry

As with many older apartments, a few surprises came up during the renovation. We were worried about timing, but our contractor handled each issue efficiently, stayed flexible when changes came up, and kept the project moving without delays. It was also reassuring to receive progress photos and see the transformation as it happened.

The biggest hurdle was getting approvals for different parts of the project, especially when it came to adding a bathroom off our master bedroom. In the end, we had to settle for a smaller space than we originally planned because of those approval constraints.

Now that we’ve been through a project like this, there are a few things we’d suggest to anyone planning something similar. First, choose your contractors carefully. We spent a lot of time researching the best options, and it paid off.

We also wanted financial clarity in our contract, with a fixed price and no surprises. And if you’re taking on a full gut reno, it’s best not to plan on living in the apartment during the work.

Once the renovation was finished, we were left with a home we truly love, with dark floors, white walls, beamed ceilings, and a modern, clean kitchen. It’s the kind of place that makes us want to host people all the time and never leave.

Thank you for sharing your home with us!

Ready to get started?


Post your project on Sweeten for free and make your dream home a reality. Sweeten puts you in control of your renovation, from finding the perfect contractor and gathering design inspiration, to using cost guides to plan your budget wisely.

Renovation materials

KITCHEN RESOURCES: 

  • Custom flat-panel cabinets in white: Miralis. 
  • Statuary Classique quartz on countertops and backsplash: MSI. 
  • Sink, #KHU23: Kraus. 
  • Faucet, #MK6557: Miseno. 
  • Refrigerator, dishwasher, and stove: Bosch/Wolf. 
  • Lighting: Restoration Hardware. 
  • Stainless steel cabinet pulls: Amerock.

MASTER BATHROOM RESOURCES: 

  • Floor and wall tile: Porcelanosa. 
  • Aquia IV elongated toilet: Toto.  
  • Starck 60″ soaking bathtub: Duravit. 
  • Vanity: Tuxedo Rough Chic custom vanity: Miralis.
  • Catalan 15″ single door medicine cabinet with triple mirror; Purist shower fixtures: Kohler.

GUEST BATHROOM RESOURCES: 

  • Vanity with rosewood facade: Duravit. 
  • Verdera medicine cabinet: Kohler.

FLOORING RESOURCE: 

  • Select oak floors finished in Ebony stain.

Frequently asked questions

A floor-to-ceiling tile is a tile installation that runs from the floor all the way up the wall to the ceiling. It creates a more continuous look, which can make a bathroom feel cleaner, taller, and more pulled together.

Yes, floor-to-ceiling tile can work especially well in a small bathroom. In this renovation, it helped both bathrooms feel larger by creating a more seamless look, whether in the marble-look primary bath or the stone-toned second bath.

French doors are a pair of doors, often with glass panes, that open between two rooms or from a room to the outside. They help separate spaces without making them feel fully closed off, which is why they worked well between the living room and office in this apartment.

A design-build team is one company or firm that handles both the design and construction sides of a renovation. This setup can make planning and communication more streamlined because the same team is shaping the layout, finishes, and building work together.

You may also like

Renovate with Sweeten!

sweeten-magic

We’ll match you with vetted general contractors and offer support until your project is done — at no cost to you!

Start your renovation

Customer review 5.0

sweeten-thumbsup

“Sweeten made the process of gathering bids easy and painless, and I was able to find a great contractor. I'll use it again.”

— Holly M. from Queens, NY

Read more reviews —>
Start your renovation
no-cost-blue

Subscribe to our
renovation newsletter