Years in the Making Brooklyn Heights Kitchen Makeover
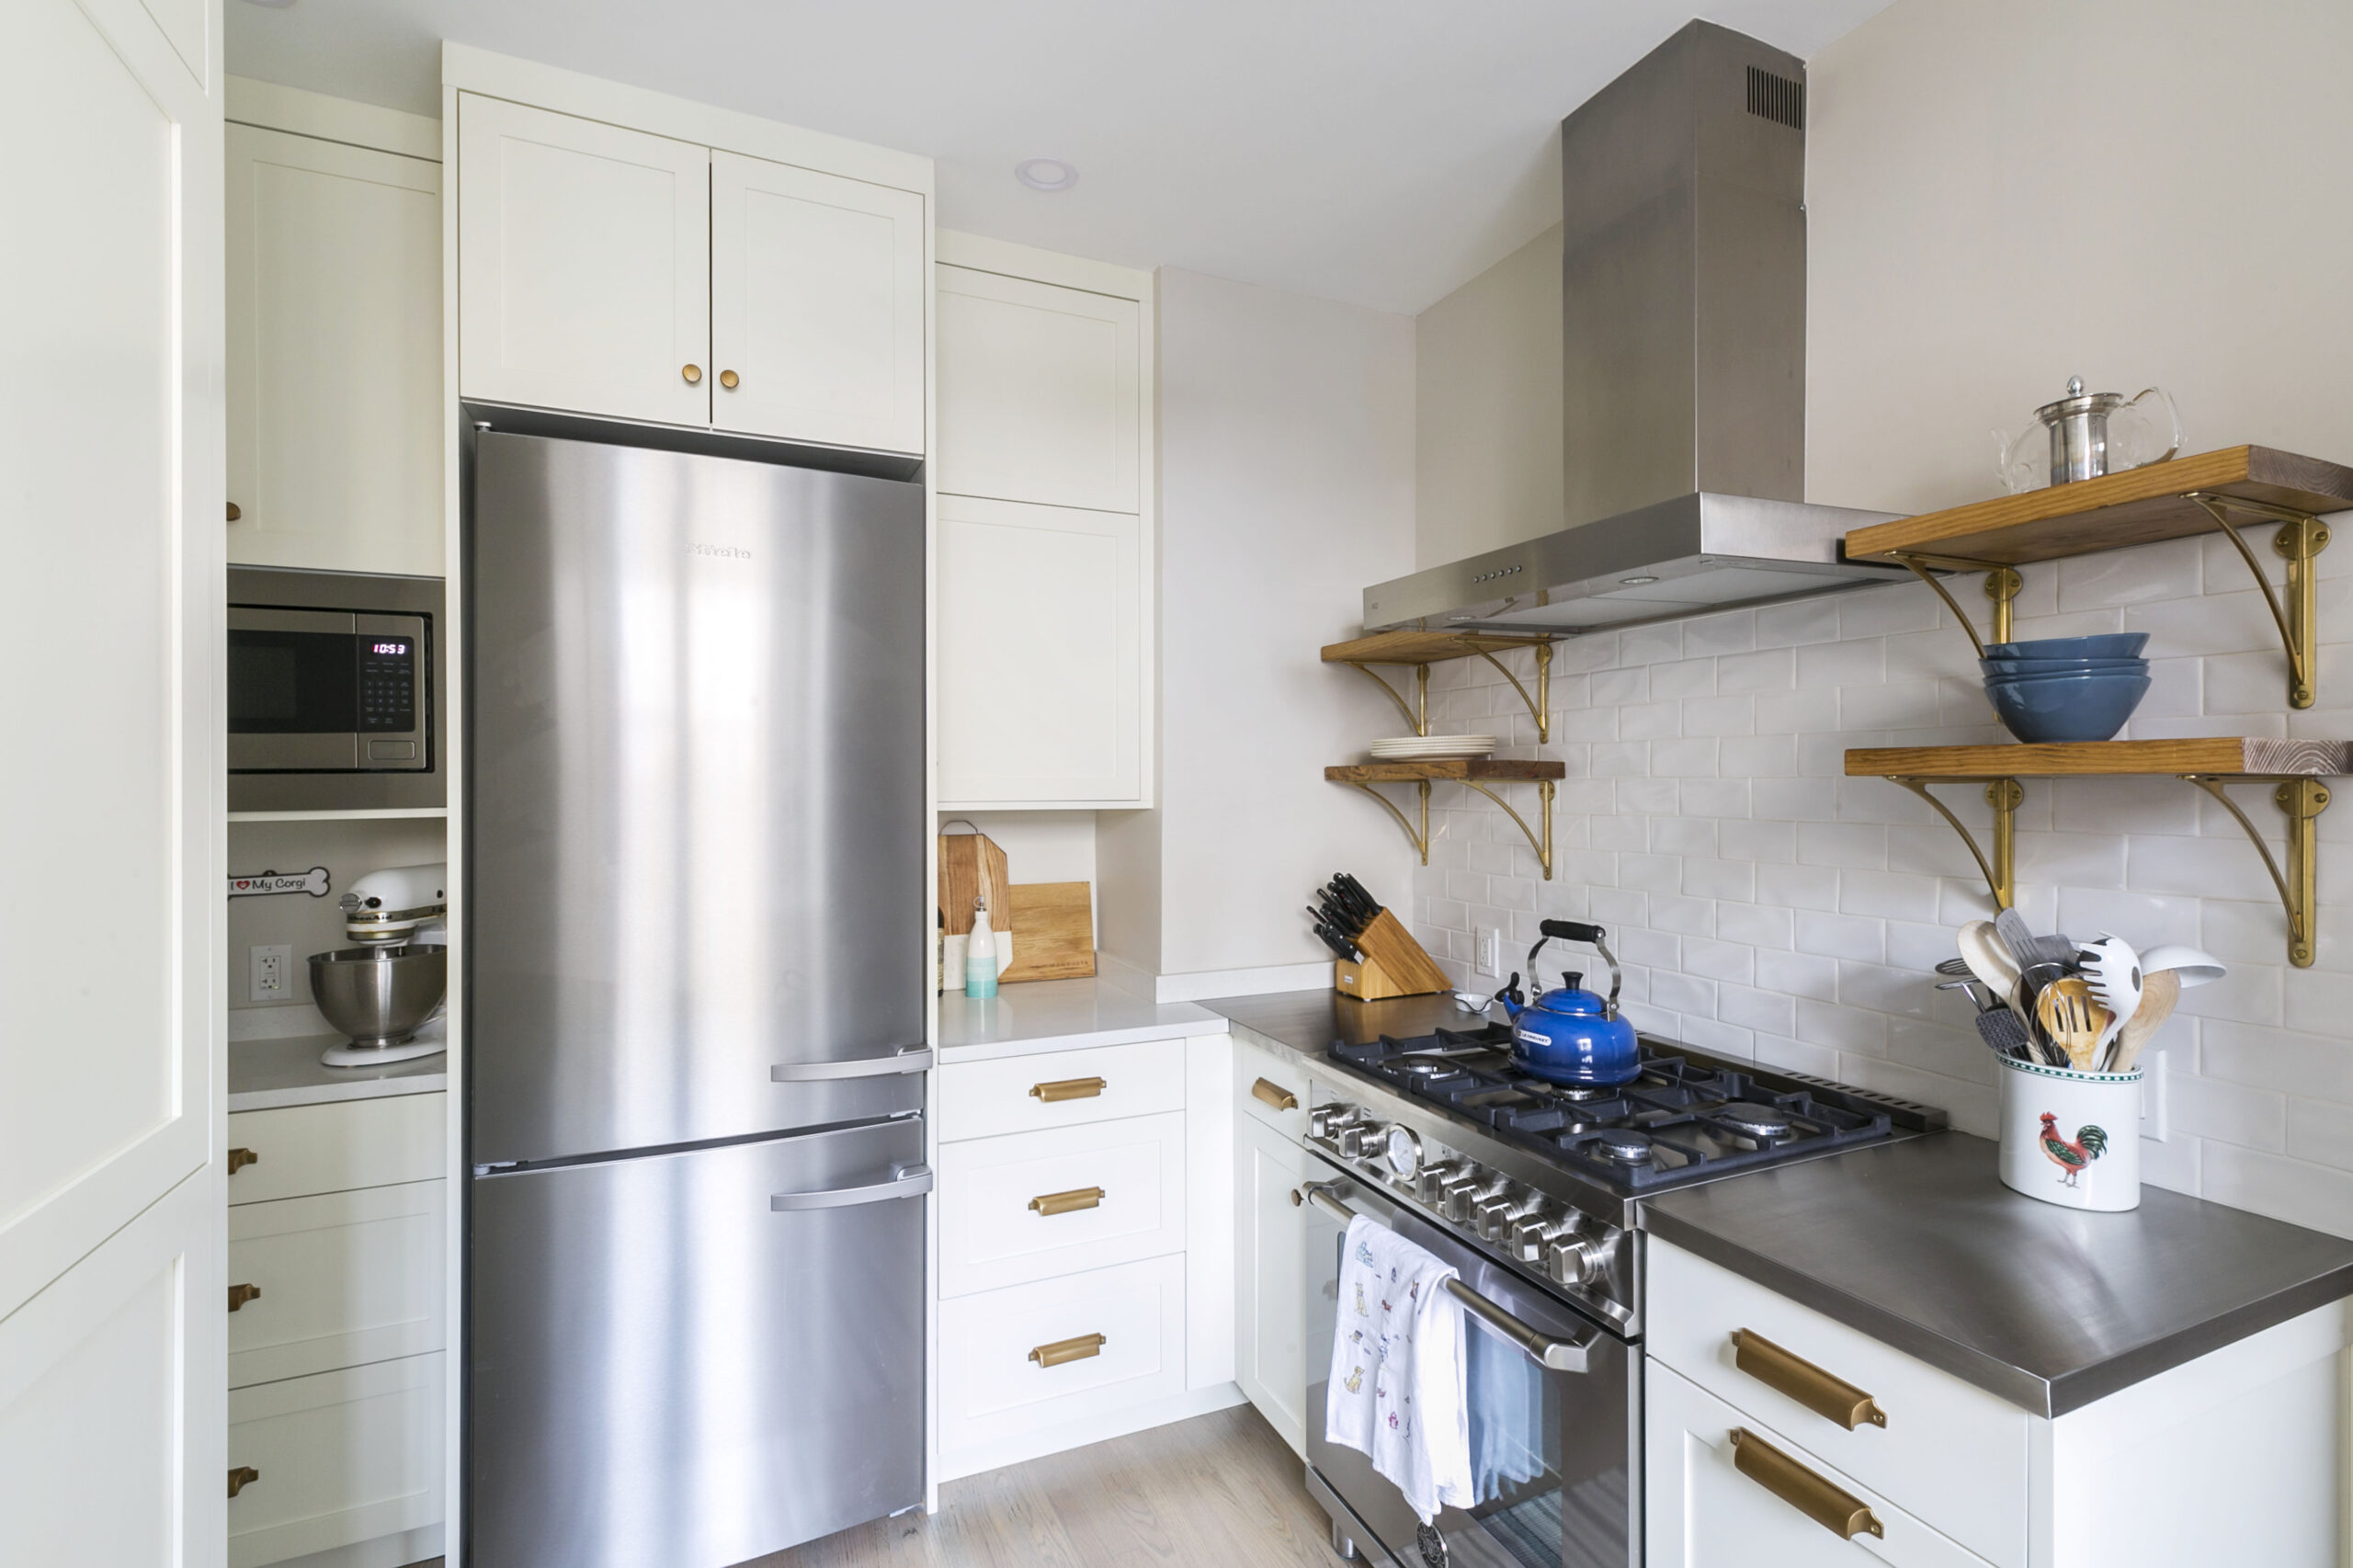
After years of meticulous planning, Lauren’s dream kitchen finally materialized in her Brooklyn Heights co-op. This remodel with Sweeten, transformed her 700-square-foot space, showcasing how thoughtful design can maximize both function and style. Her journey, from navigating a challenging layout to selecting the perfect finishes, offers invaluable inspiration for anyone considering a kitchen renovation.
For Lauren, years of planning paid off for a kitchen remodel in her Brooklyn Heights home

“After” photos by Miao Jiaxin for Sweeten
- Homeowner: Lauren posted her Brooklyn Heights kitchen remodel on Sweeten to create a multi-functional space
- Where: Brooklyn Heights, Brooklyn, New York
- Primary renovation: A kitchen in a 700-square-foot co-op that sweetens the living space too
Written in partnership with Sweeten homeowner Lauren DeMattia
Post your project on Sweeten for free and make your dream renovation a reality. Sweeten simplifies home renovation by connecting homeowners with top-rated general contractors, handling the vetting process and project management. To learn more about how we can help, check out our home renovation services.
Renovation plan: living in the space
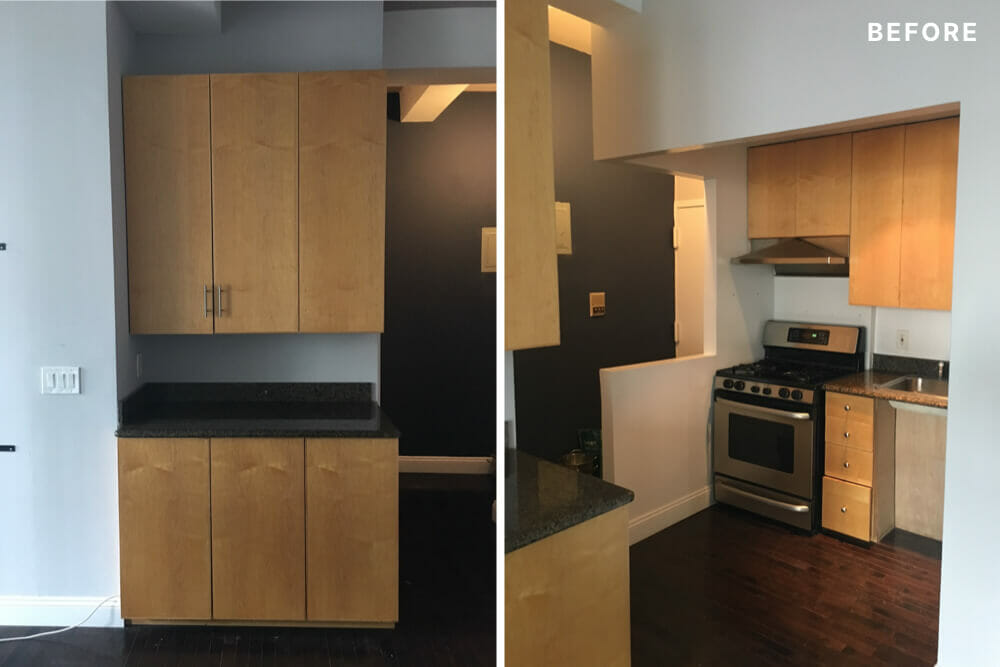
To say I won the real estate lottery might feel like an overstatement, but after a short hunt, I found a Brooklyn Heights co-op in a 1920s building. It had everything I had been looking for—two bedrooms, a corner unit, lots of windows, high ceilings, and a single block from multiple subway stations. The only drawback was that the place needed a lot of work.

Before moving in I did some things that really needed doing: putting in new hardwood floors, fully gutting the original bathroom, and installing updated electrical and lighting. At the time, the idea of touching the kitchen was out of the question—and budget. But it was, thankfully, the newest portion of the apartment and didn’t necessarily need work yet. It also had a weird layout that didn’t exactly scream a clear solution.
I’m a bit of a perfectionist, so I had a plan for my remodel. The key was living in the apartment long enough to come up with the right solution before demolition started.


Planning the new kitchen layout
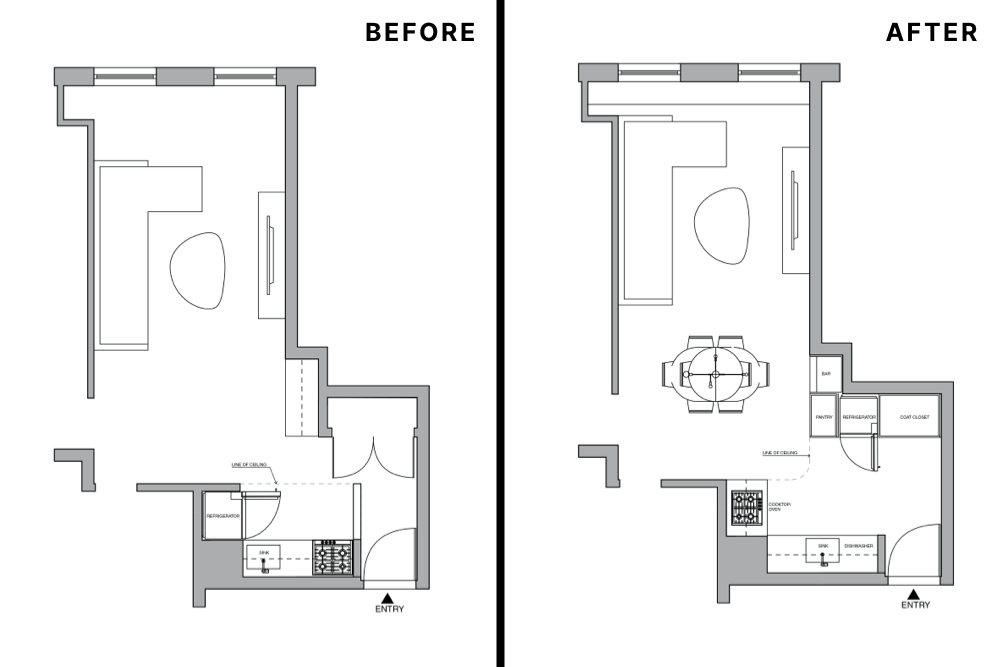
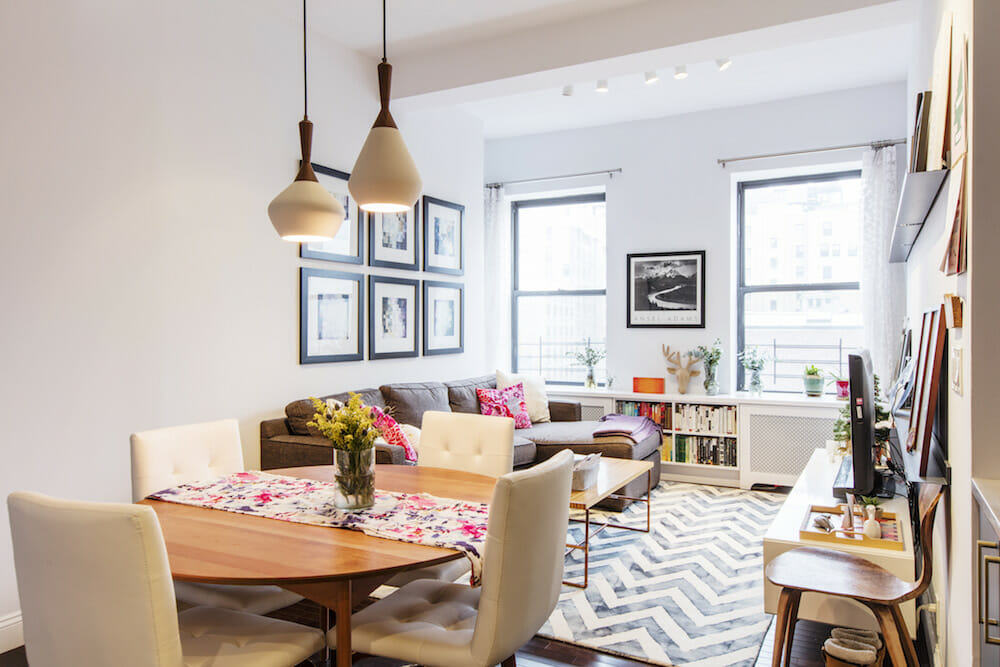
Ultimately, I knew I wanted a kitchen that felt open to the living room with lots of storage (this is NYC). I also wanted a new layout that still provided some sort of entryway and coat closet.

As soon as I moved in, I began thinking about and talking about my most recent, “brilliant” plan for the kitchen layout to friends and family. First, I was set on an island, then a peninsula, and then I thought about moving the plumbing. I realized that I had to narrow down what was (and wasn’t) working for the kitchen.
The layout technically had a lot of counter prep space, but it was in two separate areas, so I often had my back to my guests while I cooked. I loved the giant coat closet within the “entry,” but keeping it meant my options were limited.
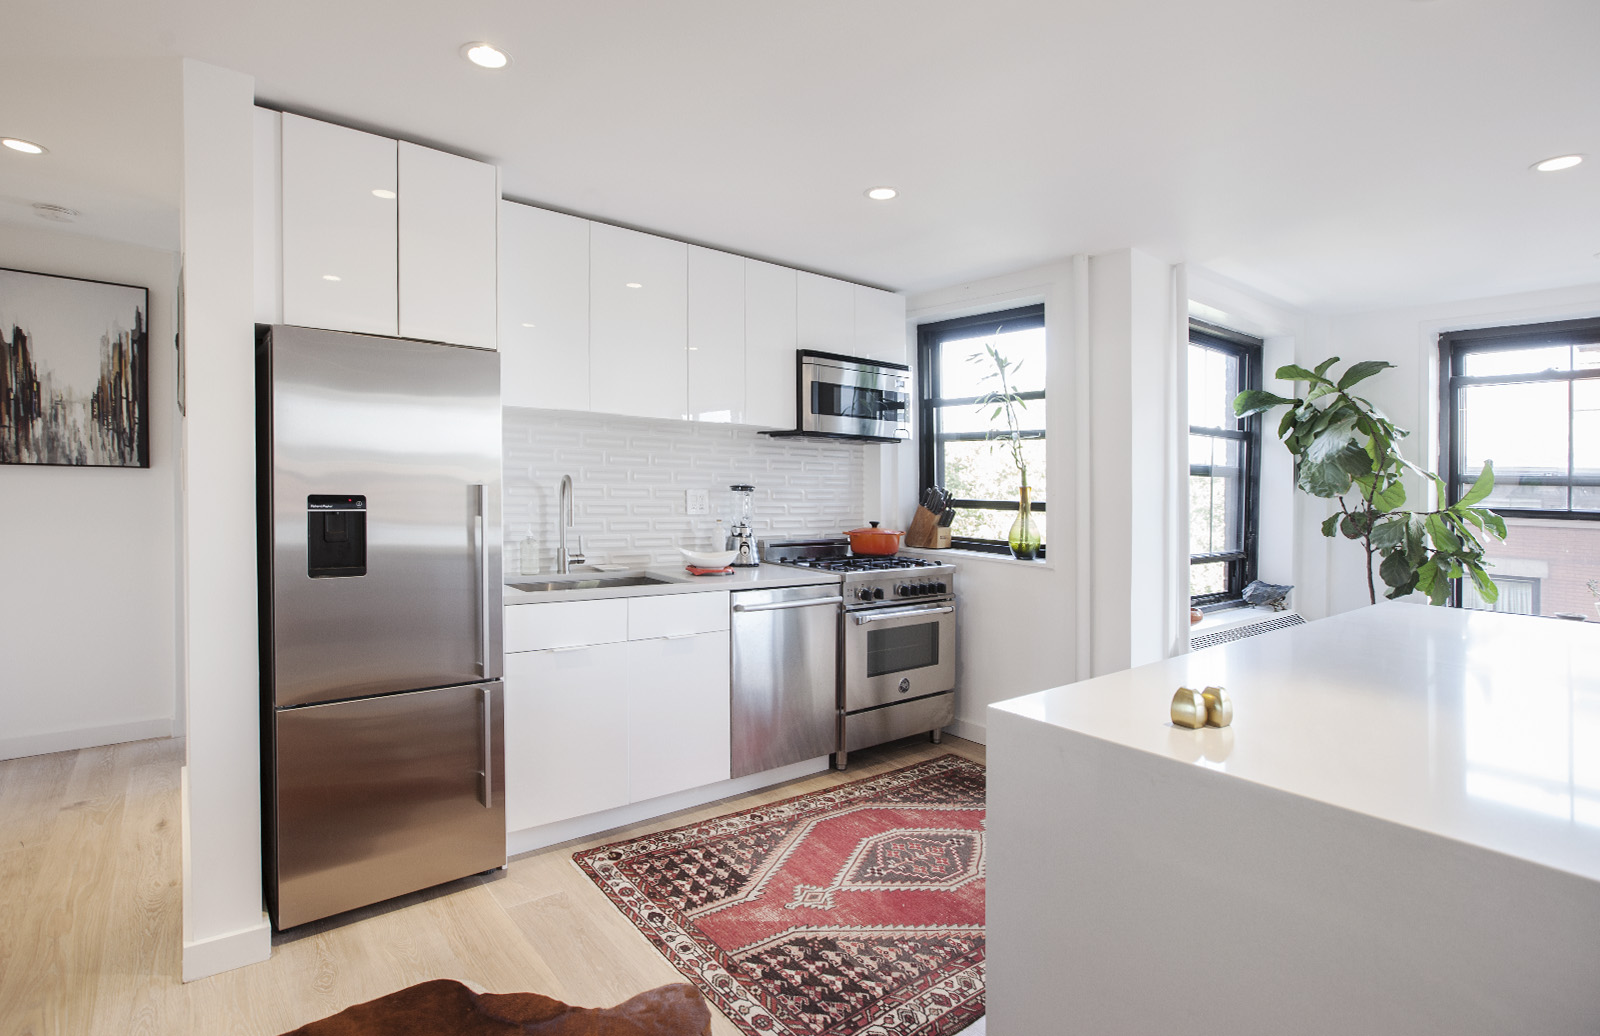
They created a sleek bookshelf that also hides my radiator and air conditioner units…
The appliances were in decent shape, though oversized for the space. A weird drop ceiling over part of the kitchen made it feel disconnected from the rest of the living room. This ceiling, coupled with a half-height wall that separated the front door from the kitchen, made the kitchen feel smaller than it actually was.
Sweeten brings homeowners an exceptional renovation experience by personally matching trusted general contractors to your project, while offering expert guidance and support—at no cost to you. 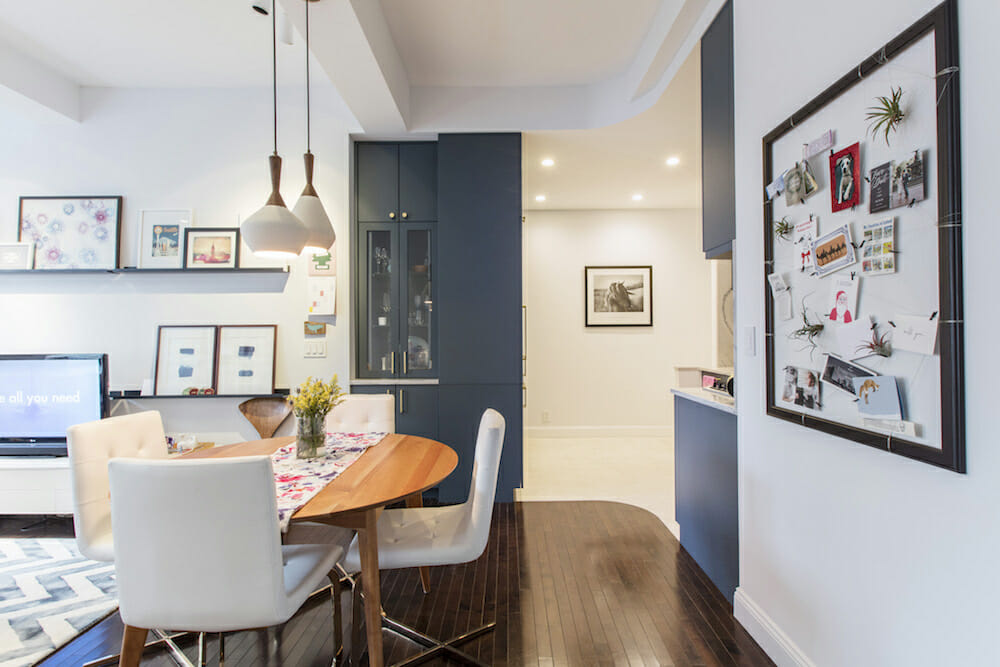
Renovate expertly with Sweeten
Adding a drop ceiling
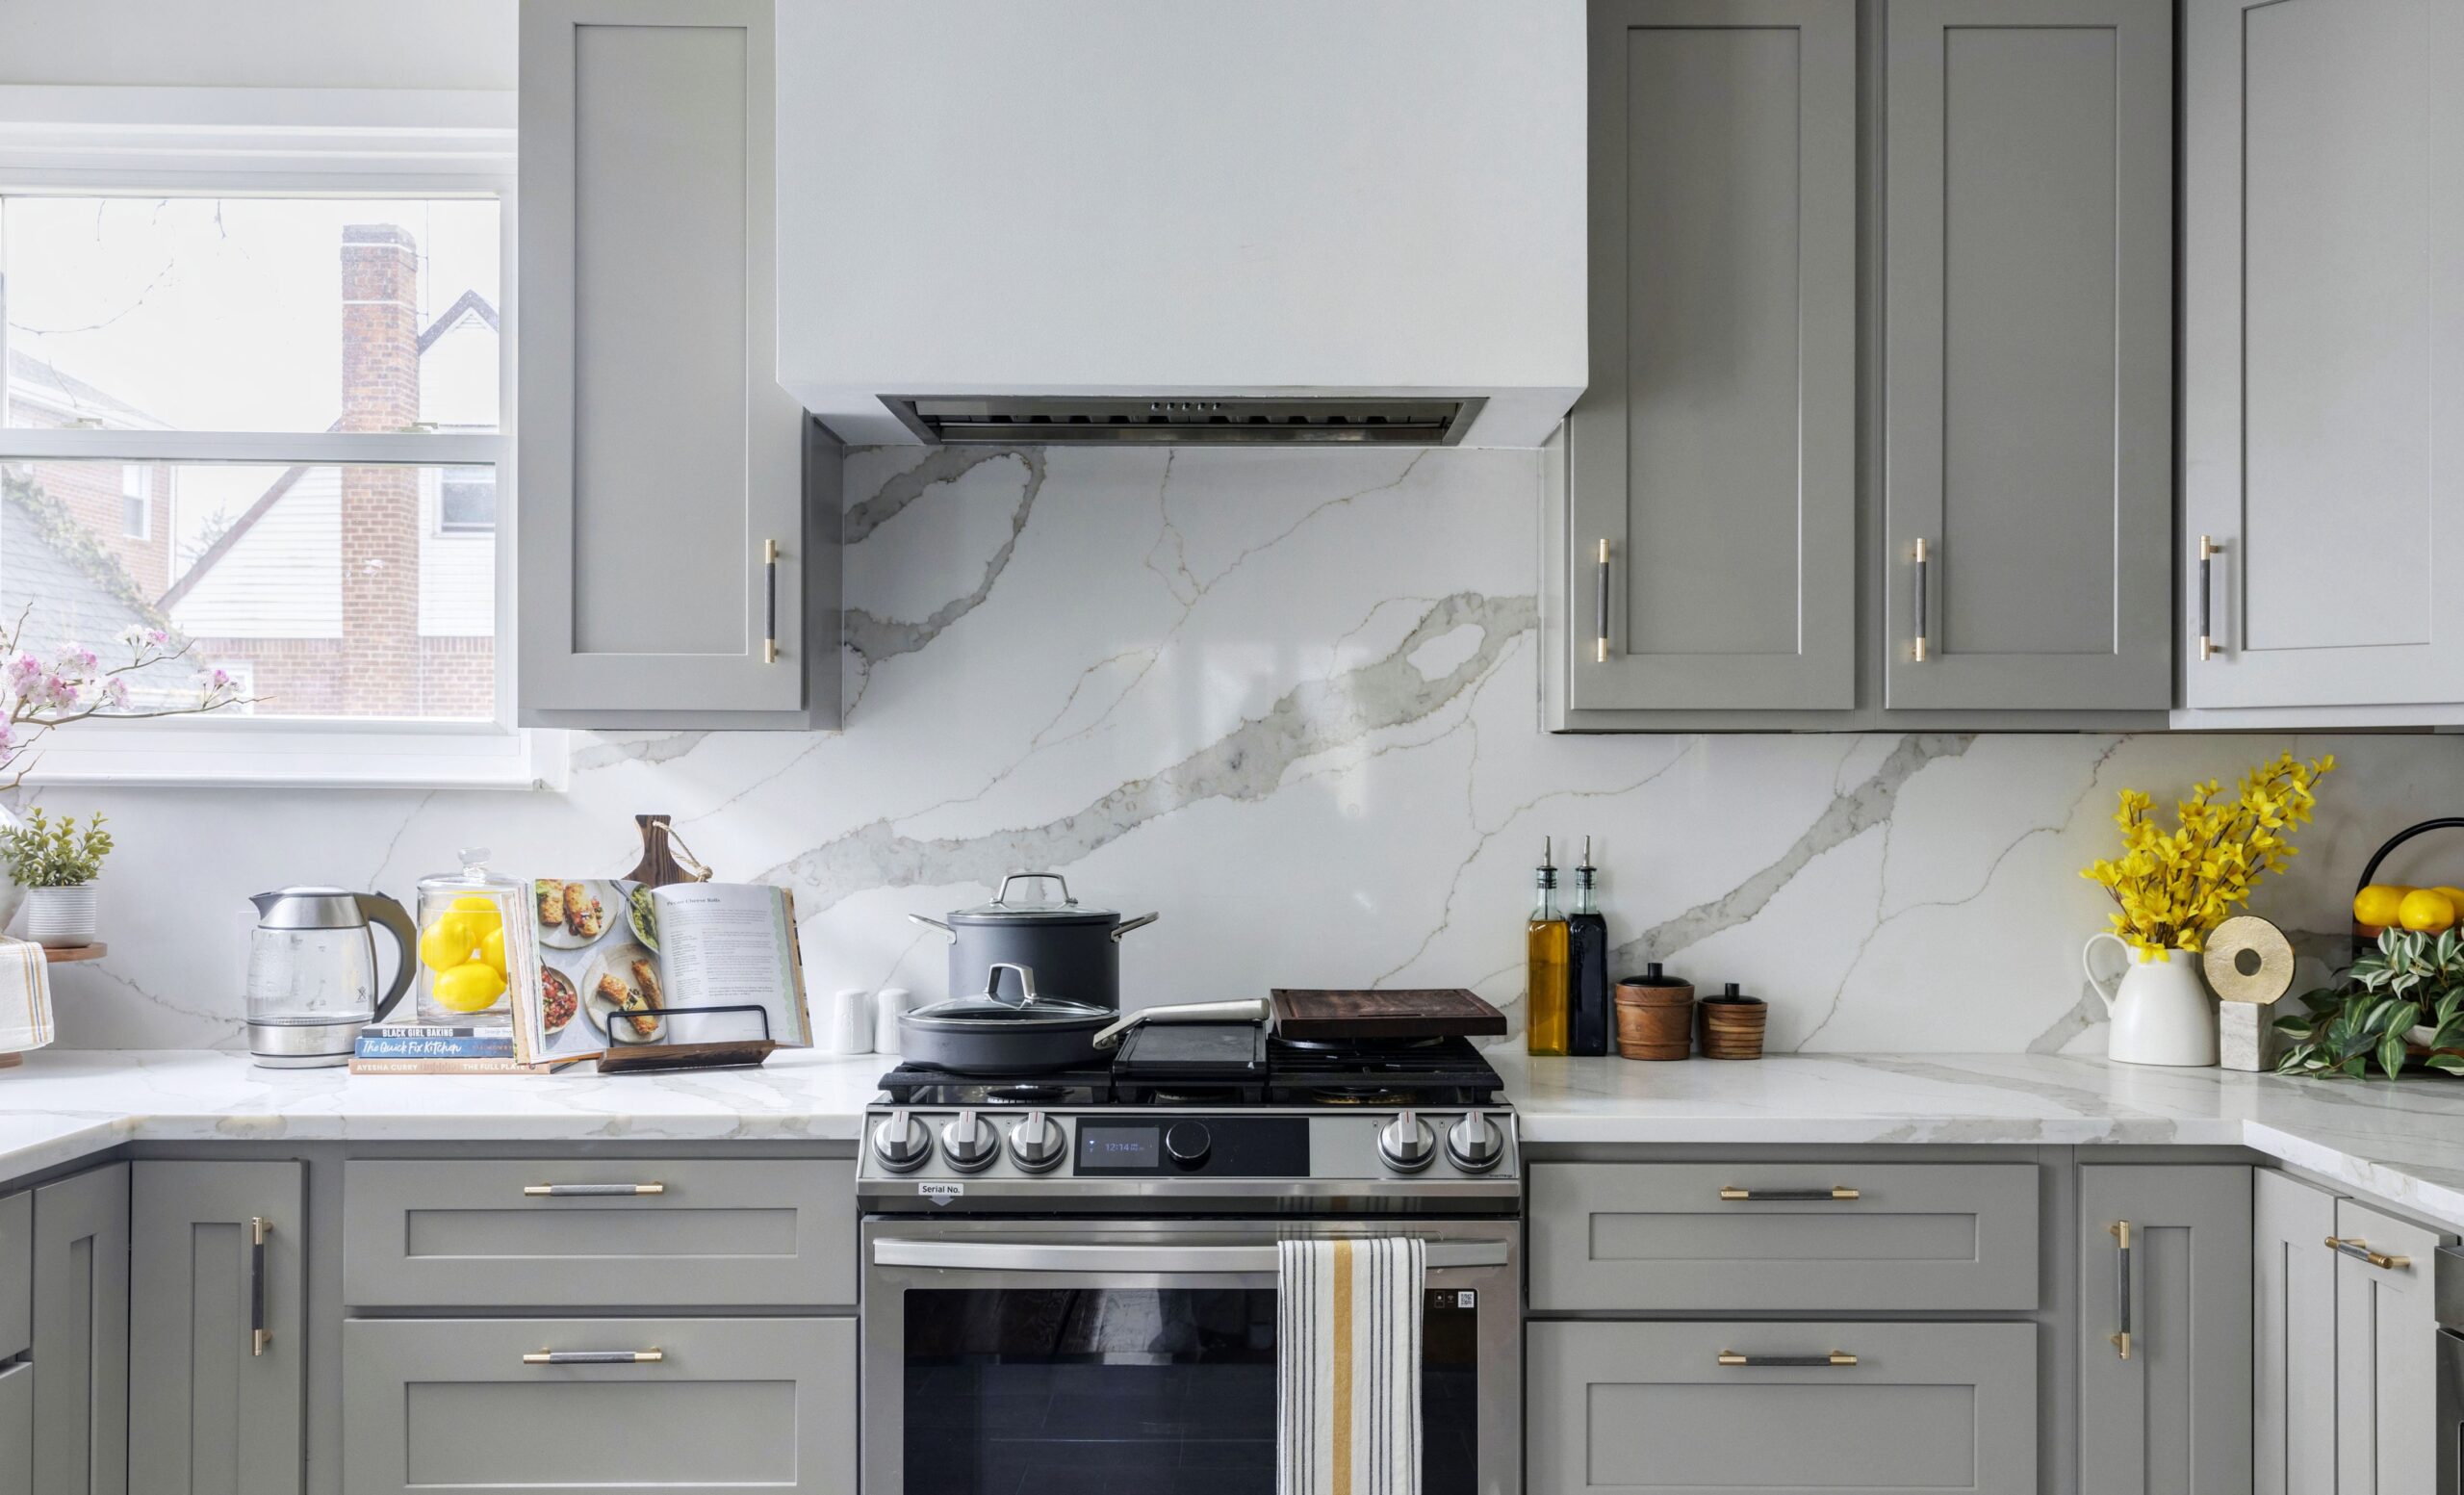
Five years and probably quite a few exasperated friends and co-workers later, I settled on a plan for the kitchen. There would be no island and no peninsula. Everything was out from floor-to-ceiling. The huge coat closet was partially removed to make room for custom cabinets, panel-ready appliances, and a new drop ceiling that mirrored the curve of the floor transition from new tile to my existing hardwood floors.

With the coat closet gone, I decided to expand the closet in my bedroom to make up for the lost space. Aesthetically, I’ve always loved blue cabinets and knew that I wanted to do darker kitchen cabinets with a lighter floor and a whiter countertop with some wood accents.
I chose a separate cooktop and oven because the space I had for the stove was much deeper than a traditional countertop and I wanted to take full advantage of the space I had. I also wanted the appliances to look seamless and fully integrated. Plus, I hate the weird space that always happens between a stove and the cabinet where dirt and food collects.
Here’s how Sweeten works: We pre-screen them for our network, carefully select the best ones for your remodeling project, and work closely with hundreds of general contractors every day.

Two prep zones
To get more workable counter space, I moved the stove to another wall. The original location of the refrigerator was a perfect spot. The sink remained on its original wall and was centered in order to get counter space on either side and keep it close to the cooktop/oven. By doing this, I created two zones for prep on each side of the sink.
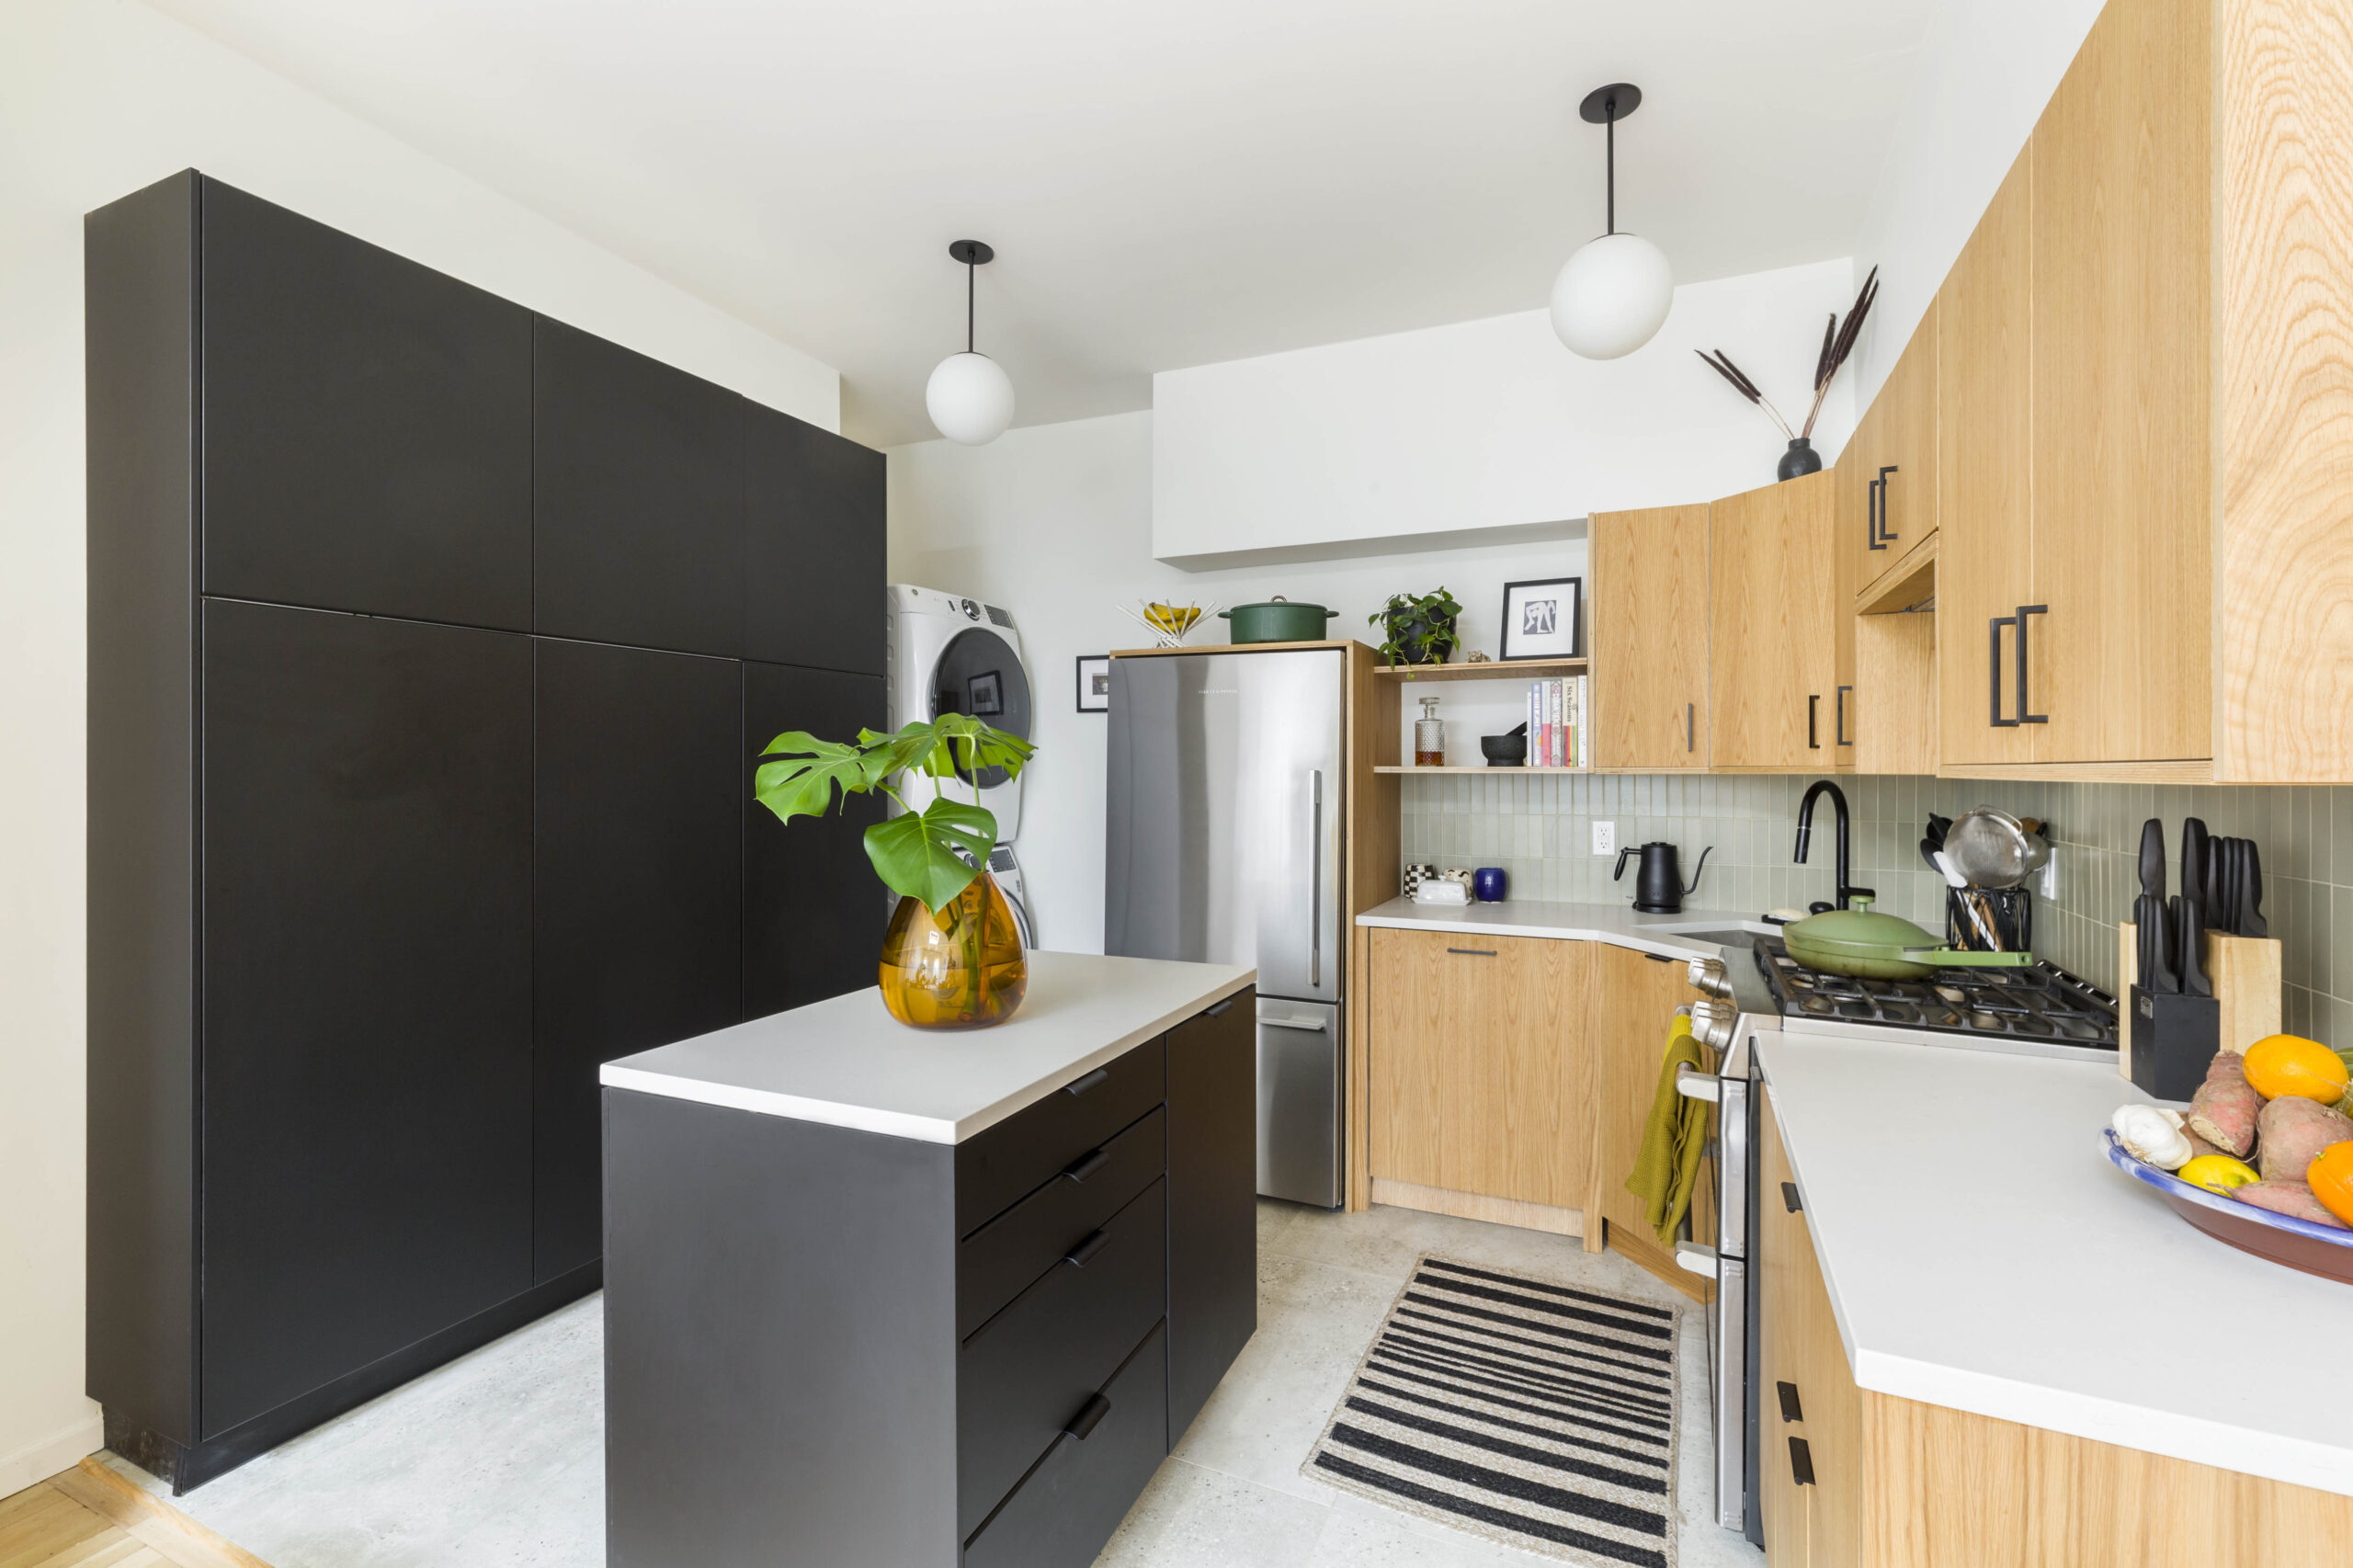
Once I made the decision about the sink and cooktop/oven, I knew that the old coat closet had to be downsized to make room for the refrigerator. I opted for a panel-ready refrigerator because I felt like opening the front door and having a seamless wall of cabinetry would help mitigate the fact that you were walking right into the kitchen. Functionally, I was also trying to create a triangle between my sink, cooktop/oven, and the refrigerator.
Just to the left of the refrigerator happened to be the perfect location for a pantry. I had some built-in, pull-out drawers earmarked for my pots and pans and a simple pull-out wire drawer (it was super easy to install!) for my pantry items. With storage, food, and the refrigerator covered, I used the remaining space to the right of the refrigerator to create a new coat closet.
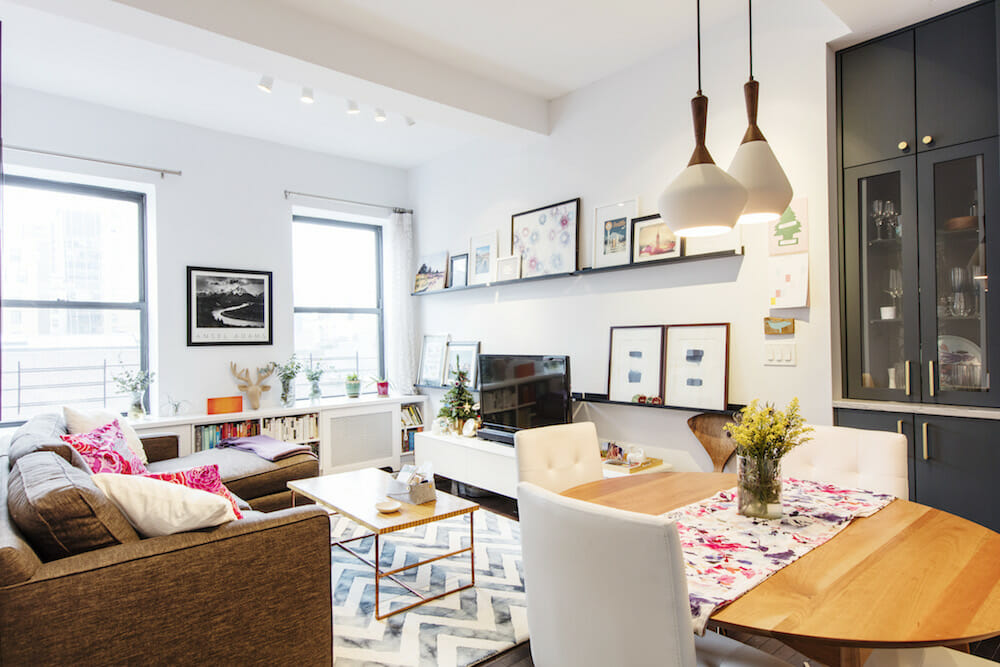
Seamless transition between kitchen and living area
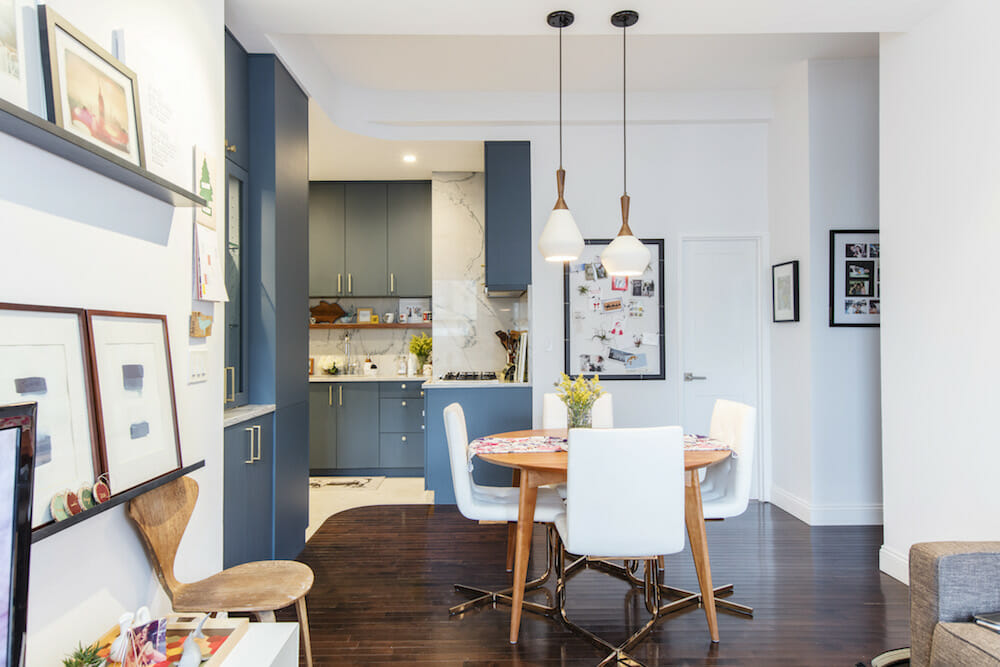
Based on the way my apartment “boundaries” were, there was a funny niche on the TV wall into which a counter and cabinets were installed. With the new design, there’s storage below where my microwave and toaster oven live and “open” storage above to display my pretty kitchen items. The glass doors open and can be tucked away so the countertop can be used as a bar top for parties.
I also wanted to have a place to eat. By pushing my living room furniture closer to the window, I made room for a new dining table and chairs. I had the pendant lights installed over the table. Extra work had to be done to build out the beam in the ceiling to hide the electrical boxes.
Much like the kitchen design, the idea of a built-in at the window had been on my mind since I bought the apartment. With a millworker already doing custom cabinets, I figured the built-in should be done as well. A sleek bookshelf was created that also hides my radiator and air conditioner units that were always annoyingly off-centered from the windows. I selected a “piano” finish on the top of the bookshelf for easy cleanup. I’m looking forward to exercising my hopefully-green thumb.
Consider all possibilities
I optimistically planned for a “quick” two-month renovation, during which I lived in the second bedroom with all my possessions and a microwave. Of course, it took almost three months before I could move back into my own bedroom, and another two months before the project finished.
My advice for anyone preparing for a renovation: take your time. Do your research; debate all the possibilities. It was better to wait and mull over all my plans (for years!) before making the investment. Using Sweeten helped with the process of finding a contractor. I appreciated being able to read references and see photos of previous projects, which helped me see the quality of each contractor’s work.
Brighter and more functional home
Renovating my own space as an architect was good and bad: good because I knew what I wanted and how to articulate it to the contractor. But also bad, or rather tricky, because I knew exactly what I wanted and expected a specific level of quality and detail.
The final result was worth the discomfort and occasional tears. I’m incredibly happy with my new space. The kitchen is so bright and open, and the layout is functional with tons of storage. Bonus: I was even able to make space for a proper dining table! Now, instead of talking to my friends about renovating, we talk about about the next time they’re coming for dinner.
Thank you, Lauren, for sharing your Brooklyn Heights kitchen remodel story with us!
Ready to start your own kitchen renovation journey?
Post your project on Sweeten for free and make your dream kitchen a reality. Sweeten puts you in control of your renovation, from finding the perfect contractor and gathering design inspiration, to using cost guides to plan your budget wisely.
Renovation Materials
KITCHEN RESOURCES: Cabinets: Custom. Cabinet knobs: Simon’s Hardware & Bath. Quartzite “macaubas” countertops and backsplash: European Granite & Marble. Bosch appliances: Bosch. Floor tile: Mosaic House. Floating Shelf: Custom. Dining table and pendants: Room & Board. Dining chairs: Overstock.
LIVING ROOM RESOURCES: Sofa: Crate & Barrel. Rug: Rugs USA. Table: DIY by the homeowner.


